Zapier Integration
Automate webpage screenshots and PDF generation across 7,000+ apps — no code required. The Rendex app for Zapier gives you triggers, actions, and searches so you can capture URLs from Google Sheets, Airtable, Slack, Notion, Gmail, and anywhere else your team works.
What You Can Automate
- Screenshot every new record in Airtable, Notion, Google Sheets, or your CRM and archive the image to cloud storage.
- Turn URLs into PDFs for invoices, reports, or compliance snapshots and email them from Gmail or Outlook.
- Weekly competitor captures — schedule a Zap to screenshot a list of competitor pages and post them to Slack every Monday.
- Batch process URLs from a spreadsheet and upload the results to Google Drive, Dropbox, or S3.
- Visual QA — trigger a screenshot on every new deployment webhook and post a before/after comparison to your team channel.
- Social media OG images — render branded HTML templates to PNG and attach them to Buffer, Hootsuite, or X posts.
Quick Setup
Connecting Rendex to Zapier takes under five minutes. If you already have both accounts, jump straight to step 3.
1. Create a Rendex API key
Sign up for a free Rendex account at rendex.dev/login. After logging in, open your dashboard and click Create API Key. The free tier includes 100 screenshots per month, enough to validate your workflow before upgrading.
Copy the key — it looks like rdx_followed by 22 characters. You'll paste it into Zapier in step 3.
2. Find Rendex in Zapier
Open zapier.com and create a new Zap. When adding an action or trigger, search for Rendex in the app directory. Select it and pick one of the 12 available steps (see the reference tables below).
3. Connect your Rendex account
Zapier will prompt you to authenticate. Paste your rdx_… API key and click Yes, Continue. Zapier validates the key against api.rendex.dev and confirms the connection. Your key is stored encrypted at rest by Zapier and is never exposed in Zap run logs.
4. Build your first Zap
Pick any trigger — a new row in Google Sheets, a new Airtable record, an incoming email — then add the Capture Screenshot action from Rendex. Map the URL field from your trigger to the Rendex url input, set format to png, toggle Full Page if you want the entire scrollable page, and test the step. Rendex returns a file you can attach, upload, or email in the next Zap step.
Triggers
Triggers start a Zap when something happens in your Rendex account.
| Trigger | Type | Use For |
|---|---|---|
New Completed Screenshot | Polling (every 1–15 min) | Kick off a follow-up workflow every time a background screenshot or PDF finishes. Ideal for archiving or notification Zaps. |
Two internal triggers — List Recent Jobs and List Recent Batches— power the dynamic dropdowns in the Get Job Status and Get Batch Status searches. They are hidden from the Zap editor and don't count toward your task usage.
Actions
Actions run when a Zap fires. The Rendex app for Zapier exposes nine actions.
| Action | Returns | Best For |
|---|---|---|
Capture Screenshot | PNG, JPEG, WebP, or PDF file (sync) | Most workflows. Returns the image inline so the next Zap step can attach or upload it. |
Generate PDF | PDF file (sync) | Invoices, reports, compliance snapshots. Configure page size, margins, orientation. |
Create Render Link | Hosted, auto-caching image/PDF URL (sync) | og:image social previews and <img> embeds. Returns a durable URL to drop into a CMS field or post — no file to re-upload. |
Extract Text | Clean Markdown, JSON, or article HTML (sync) | Pull reader-mode content from a URL for LLM/RAG pipelines, summaries, or content archives — no image. |
Capture Screenshot (Background) | Job ID (async) | Heavy or slow pages. Pair with a webhook or the Get Job Status search to retrieve the result later. |
Submit Batch | Batch ID (async) | 10–500 URLs at once depending on your plan (batch is a paid-plan feature). Apply shared defaults (format, viewport, full-page, dark mode, CSS/JS, geo, and PDF page options) to every URL. Pair with Get Batch Status to check progress. |
Test a Website Watch | Dry-run preview — reachable + capture (sync) | Validating a page before you monitor it. Renders the page once and reports whether it could be read and what it saw — nothing is saved, no alerts are set. Pair with Create Website Watch once the preview looks right. |
Create Branded Artifact | Hosted PDF, PNG + share link (sync) | Turn Markdown or HTML into a branded document — add a logo, accent color, header, and footer. Great for reports, invoices, and one-pagers. Returns the URLs right away, no polling. |
Get Account & Usage | Plan + this month's usage (sync, free) | Read your plan, credits used / limit / remaining, reset date, and per-minute rate limit. Always free — branch a Zap on how many renders you have left. |
Common action inputs
All capture actions accept the same set of rendering options. Required fields are highlighted.
| Field | Required | Description |
|---|---|---|
Source Type | Yes | Choose url to capture a live page, html to render raw HTML markup, or markdown to turn Markdown into a finished image or PDF (max 5MB). |
URL | If Source = url | Full webpage URL including https:// |
HTML | If Source = html | Raw HTML markup to render and capture. Great for invoices, social cards, email templates. |
Output Format | No (default png) | png, jpeg, webp, or pdf |
Full Page | No | Capture the full scrollable page instead of the viewport. |
Viewport Width / Height | No | Default 1280×800. Use 375×812 for mobile, 1920×1080 for desktop HD. |
Dark Mode | No | Render the page with dark color scheme enabled. |
Wait For Selector | No | CSS selector to wait for before capture — useful for SPA hydration. |
Geo Country | No | Two-letter ISO code (e.g. US, DE, JP). Pro and Enterprise plans only. |
Webhook URL | Async only | Paste a Zapier Catch Hook URL here to trigger a follow-up Zap when the async job completes. |
Link Expiry (seconds) | Create Render Link only | How long the hosted link stays valid — 3600 (1 hour) to 2592000 (30 days). Leave blank for the 30-day default. |
See the full parameter list in the API Reference — every REST field is exposed in the Zapier editor.
Searches
Searches look up data inside Rendex. Use them after an async action to retrieve results.
| Search | Returns | Pair With |
|---|---|---|
Get Job Status | Job status + signed result URL | Capture Screenshot (Background) |
Get Batch Status | Batch progress + per-URL results | Submit Batch |
Create a Hosted Render Link (og:image URLs)
Reach for the Create Render Link action when you need a permanent image or PDF link instead of a one-off file. Rather than handing the next step a downloaded image, Rendex returns a hosted, signed URL that renders your URL, HTML, or Markdown the first time someone opens it, then serves the same edge-cached copy on every visit after that. That makes it ideal for an og:image social-preview tag or an <img> embed — drop the link in once and every share reuses the cached render.
How it differs from Capture Screenshot. Capture Screenshot hands the next step the actual image file to attach, upload, or email. Create Render Link hands it a durable URL instead — no re-upload, no storage step, and the picture stays live for as long as the link does.
Set it up
- Add the Create Render Link action and choose your Source Type — a URL, raw HTML, or Markdown — exactly like the Capture Screenshot and Generate PDF actions.
- Map your source field, set the Output Format (PNG, JPEG, WebP, or PDF), and add any sizing or advanced options you would use on a normal capture.
- Optionally set Link Expiry (seconds) — anywhere from one hour (
3600) to 30 days (2592000). Leave it blank and the link stays valid for the 30-day default.
Use the link downstream
When the step runs, Rendex exports a few fields the rest of your Zap can map into later steps:
| Field | What it is |
|---|---|
url | The hosted image/PDF link. Drop it into an og:image field, an image embed, a Slack or Buffer post, or any image-upload step. |
expiresAt | When the link stops working — use it to refresh the link on a schedule if you need it to live longer. |
format | The format you chose — png, jpeg, webp, or pdf. |
cacheTtl | How long each rendered copy is cached at the edge before Rendex refreshes it. |
Common follow-up steps: write url into a Webflow or WordPress og:image field, paste it into a Slack or Buffer post, or pass it to an image-upload action that stores the link in Airtable or a Google Sheet.
Screenshot a Page Behind a Login (Cookies)
To capture a page that only loads once you're signed in — an internal dashboard, an account view, a members-only report — paste a session cookieinto the Capture Screenshot action's Cookies field. Rendex replays the cookie in its browser, so the page renders as the logged-in user instead of a sign-in wall. Cookies and Custom Headers are a Rendex Starter+ feature — a free key returns a 403 PLAN_UPGRADE_REQUIRED when those fields are set.
Get your session cookies
- Log into the target site in your browser as you normally would.
- Export the site's cookies. The quickest way is a free browser extension like Cookie-Editor or EditThisCookie: open it on the logged-in page and choose Export → JSON. (Manual alternative: open DevTools → Application → Cookiesand copy each cookie's
nameandvalue.) - Paste the JSON array into the Cookiesfield and set the action's URL to the page you want to capture:
[
  { "name": "session_id", "value": "eyJhbGciOi...", "domain": ".app.example.com", "path": "/" },
  { "name": "auth_token", "value": "a1b2c3d4...", "domain": ".app.example.com", "path": "/" }
]
Each cookie needs at least a name and value; domain, path, secure, httpOnly, sameSite, and expires are optional. You can send up to 50 cookies, and add a Custom Headers object alongside them if the app authenticates with a bearer token or a tenant header.
Two honest caveats. Session cookies expire, so a scheduled Zap will eventually capture the logged-out page and you'll need to re-export fresh cookies — for long-lived Zaps, grab the cookie from a login request earlier in the Zap so it refreshes on every run. And treat the cookie like a credential: anyone holding it can act as that session, so prefer a scoped or short-lived login where you can. Full walkthrough: Screenshot a page behind a login in Zapier.
Test a Website Watch (Before You Create It)
Rendex can also monitora page on a schedule and alert you when it changes — that's the Create Website Watch action and the Website Changed trigger in the same Rendex app. Before you set one up, the Test a Website Watch action lets you try a watch on a page once, right now, without creating it. Rendex captures the page a single time and tells you whether it could read it and what it saw — so you can confirm the page works and your settings are right before you commit to ongoing monitoring. Nothing is saved and no alerts are set up.
When to use it.Run a quick test whenever you're unsure a page is reachable (some sites block automated visits or hide content behind a login), or when you want to check that your What Counts as a Change, device, or Watch Only This Part of the Page settings capture the right thing — all without leaving a half-configured watch running.
Set it up
- Add the Test a Website Watch action and paste the Web Page URL you plan to monitor.
- Pick What Counts as a Change — a visual (picture) diff, a text diff, or both — and add any of the same capture options a real watch uses: watch only part of the page, ignore certain sections or text, full page, device, dark mode, ad and cookie-banner hiding, or check-from-country.
- Test the step. There's no schedule or alert to set — a dry run just renders the page once.
What you get back
The action returns a quick report your later steps can read or branch on:
| Field | What it tells you |
|---|---|
ok | Whether the page rendered successfully. |
reachable | Whether Rendex could actually read the page. If this is false, the page may be blocked or behind a login. |
screenshotUrl | A short-lived link to the one-off capture — open it to see exactly what a watch would record. |
httpStatus | The page's response code (for a URL), so you can spot a 403 or 404 before monitoring ever starts. |
extractedText | The text a text watch would compare, when you chose a text or both change type. |
Happy with the preview? Switch to the Create Website Watch action — same URL and settings, plus a check schedule and alert destination — to start monitoring for real. See the Rendex for Zapier overview for the full monitoring workflow.
Workflow Recipes
Copy these Zap shapes directly. All are 2–4 steps and work on the free Zapier plan (single-step triggers) or Starter (multi-step).
Start a Zap in one click
Pick a Rendex Zap below and Zapier walks you straight into building it — connect your apps, confirm the fields, and turn it on. No copying steps by hand. Want the full walkthrough with a real input→output preview first? Those are just below.
Popular Zaps — full walkthroughs
Each of these is a complete, source-accurate guide with the exact trigger, the native Rendex action, and every field mapping — plus a real input→output preview. Open one to build it step by step. (A Zap has no importable file the way an n8n workflow does; these walkthroughs are the one-click equivalent — build each once and it runs on autopilot.)
Turn every Airtable row into a branded Open Graph image. A Make HTTP module or Zapier action calls Rendex's hosted render link, then writes the og: URL straight back to the row.
Turn a Typeform or Google Forms submission into a branded PDF — a receipt, certificate, or confirmation — with Zapier's native Rendex Generate PDF action, then email it back. No code, no PDF library, no headless browser.
Add a URL to a Google Sheet (or Airtable) and Zapier captures a full-page screenshot with the native Rendex action, then files it in Google Drive — no code, no headless browser, on the free tier.
Schedule a daily or weekly full-page screenshot of any page and file it in Google Drive or Dropbox with a dated name — a visual history built automatically with Zapier's native Rendex action. No code, free tier.
Capture an authenticated page — a dashboard, admin view, or member-only report — with Zapier's native Rendex action by passing a session cookie. No browser to script, no code. Cookies are a Rendex Basic+ feature.
Monitor any page with Rendex Watch and let Zapier's native Website Changed trigger post the change to Slack — a plain-English summary of what changed plus a cropped image of the exact spot. No cron, no webhook, no code.
When Rendex Watch detects a change on a page, let Zapier's native Website Changed trigger open a Jira, Trello, or Asana ticket automatically — titled with what changed and carrying a cropped image of the exact spot. A change that needs action belongs on a board, not just a channel.
Turn Markdown into a polished, branded PDF — your logo, colors, and layout — with Zapier's native Rendex Create Branded Artifact action, then email it out on a schedule. No design tool, no code, on the free tier.
When a new URL appears in an RSS feed or a sheet, pull the clean article text — title, byline, and body — with Zapier's native Rendex Extract Text action, then log it to Google Sheets or feed it to an AI step. No scraping, no code, free tier.
Feed a column of URLs from a Google Sheet to Zapier's native Rendex Submit Batch action and get every screenshot back in parallel — then poll with Get Batch Status and store the results. No loop to build, no code.
Turn Rendex Watch into a permanent change log. When a monitored page changes, Zapier's native Website Changed trigger appends a timestamped row to a Google Sheet — what changed, the diff score, and links to the before, after, and cropped images. A searchable history you can sort, filter, and prove from.
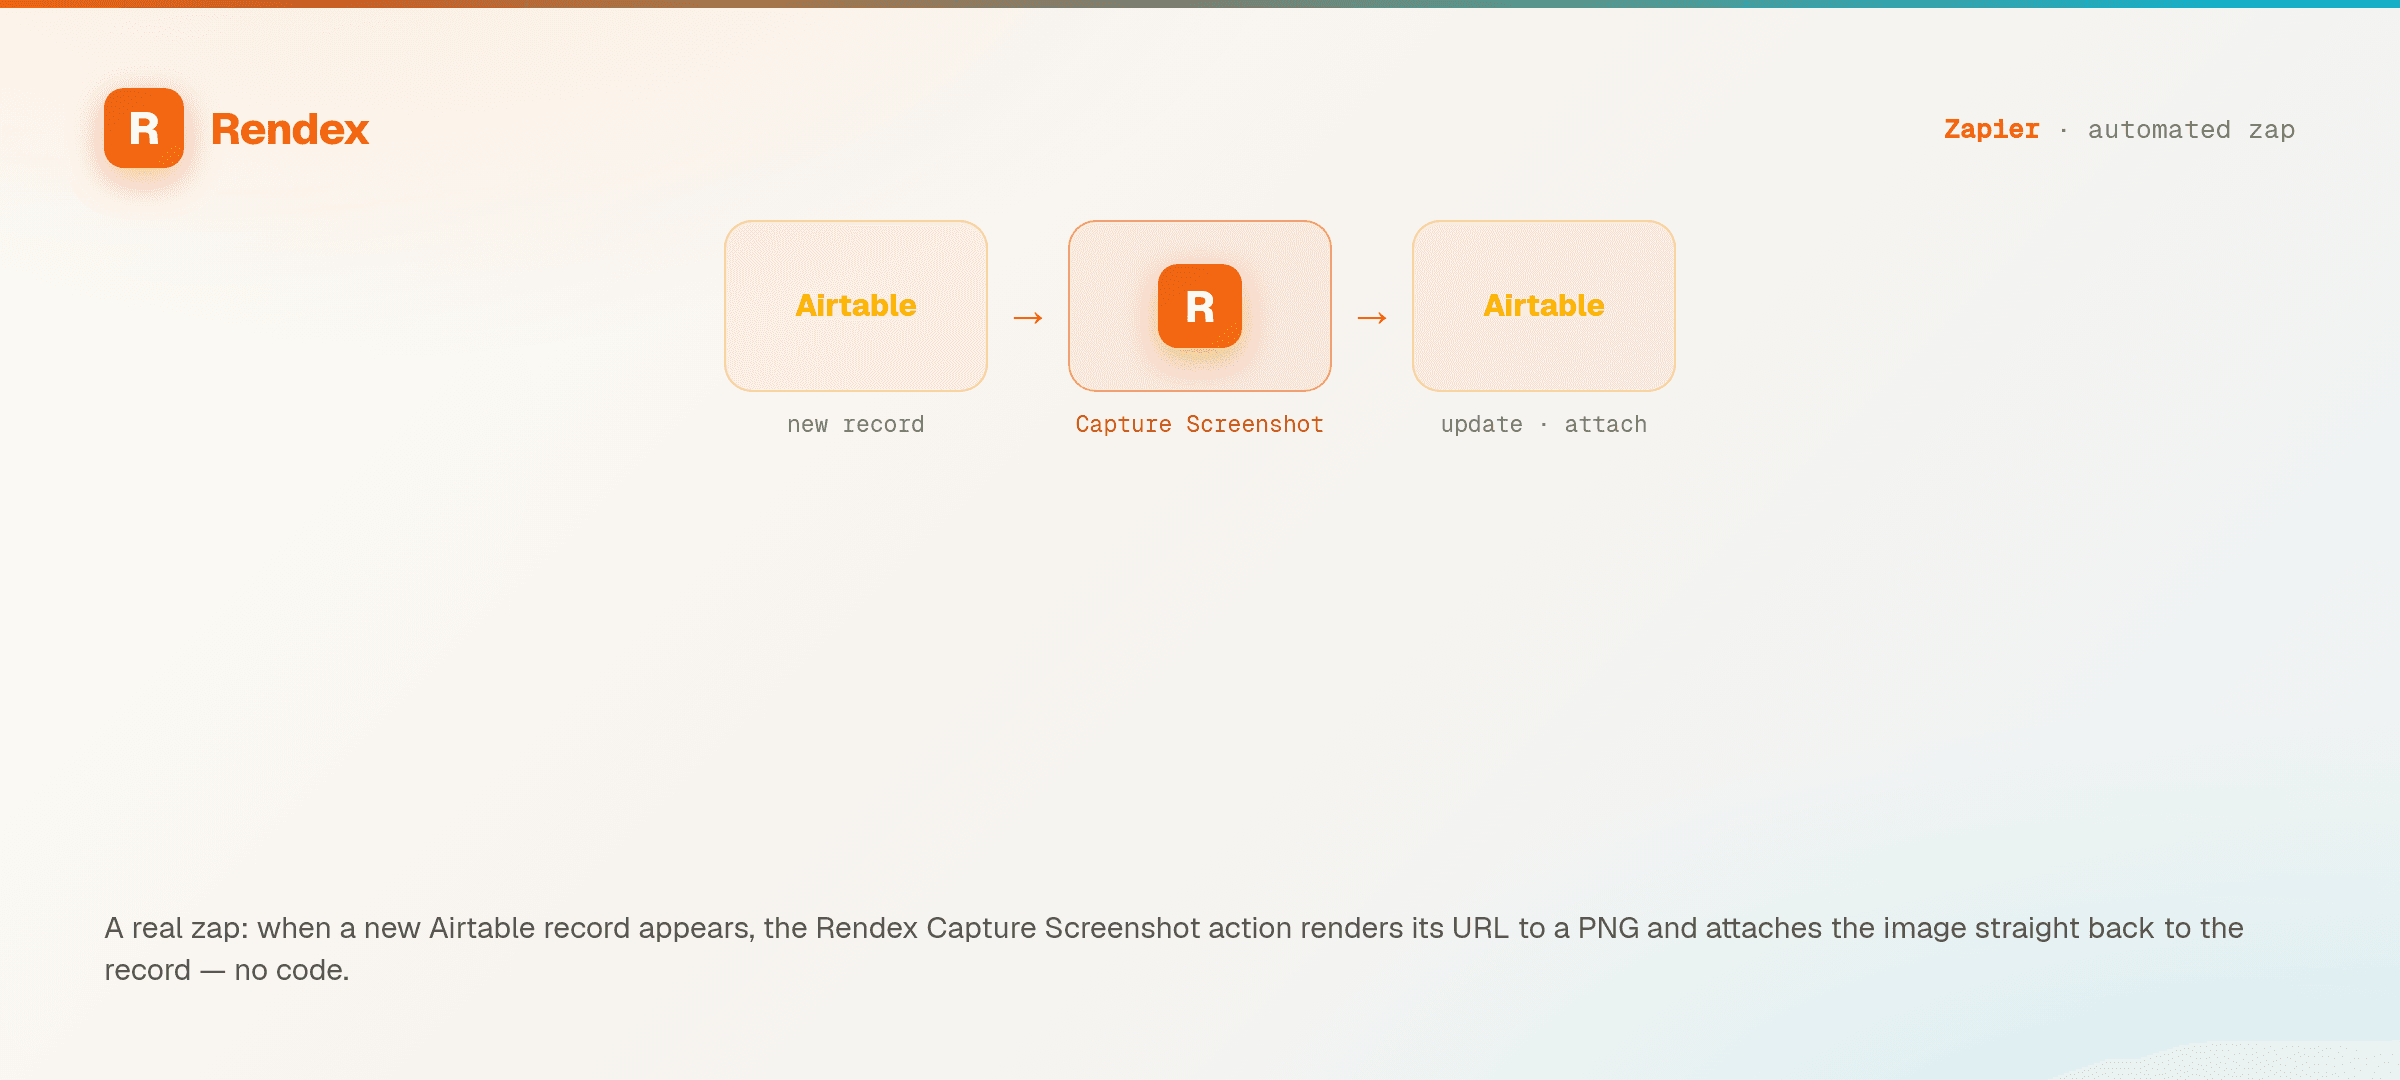
Recipe 1 — Screenshot every new Airtable record
- Trigger: Airtable — New Record in a view that contains a URL field.
- Action: Rendex — Capture Screenshot. Map
urlto the Airtable URL field. Set format topngand toggle Full Page. - Action: Airtable — Update Record. Attach the returned
fileto a screenshot field.
Recipe 2 — Weekly competitor screenshots to Slack
- Trigger: Schedule by Zapier — Every Monday at 9am.
- Action: Rendex — Submit Batch. Paste your competitor URL list (one per line). Format
png, Full Page on. - Action: Delay by Zapier — Wait 5 minutes.
- Action: Rendex — Get Batch Status. Map the Batch ID from step 2.
- Action: Slack — Send Channel Message with the result URLs.
Recipe 3 — URL-to-PDF invoice archive
- Trigger: Stripe — New Invoice (or any invoice system).
- Action: Rendex — Generate PDF. Map
urlto the hosted invoice URL. Set Page Size to A4, Print Background on. - Action: Google Drive — Upload File. Attach the returned PDF.
- Action: Gmail — Send Email with the Drive link.
Recipe 4 — Async capture with webhook callback
- Trigger: Webhooks by Zapier — Catch Hook (generates a URL; copy it).
- Action: Rendex — Capture Screenshot (Background). Paste the Catch Hook URL into the Webhook URL field.
- When Rendex finishes the job, Zapier fires a second Zap with the result payload. Chain any follow-up action — Slack, Drive, email.
Recipe 5 — Auto-set an og:image link for every new post
- Trigger: Webflow, WordPress, or your CMS — New Published Item.
- Action: Rendex — Create Render Link. Set Source Type to
html(or a URL) and map the post title and image into your social-card template. Leave Link Expiry blank for the 30-day default. - Action: Your CMS — Update Item. Write the returned
urlinto the post'sog:imagefield. Rendex renders the card on first share and serves the cached copy everywhere after.
Plan Limits
Every Rendex API limit applies inside Zapier. Batch sizes scale with your plan:
| Rendex Plan | Max URLs per Batch | Monthly Captures |
|---|---|---|
| Free | — (Starter+) | 100 |
| Starter ($69/mo) | 25 | 10,000 |
| Pro ($179/mo) | 100 | 100,000 |
| Enterprise | 500 | Custom |
See the pricing page for full plan details. Zapier task usage is separate from Rendex usage — each action run in Zapier counts as one Zapier task.
Tips & Best Practices
- Prefer sync for small pages. Use Capture Screenshot (the sync action) when pages load in under 10 seconds — your Zap finishes in a single step with no polling needed.
- Prefer async + webhook for heavy pages. Use Capture Screenshot (Background) with a Catch Hook URL when pages are slow or you expect long queues. You get a clean handoff instead of blocking a Zap run.
- Use Wait For Selector for SPAs. React, Vue, and Next.js apps often render content client-side. Setting
waitForSelectorto a DOM element that appears after hydration avoids screenshotting a loading spinner. - Cache TTL saves money. If multiple Zaps might capture the same URL, set
cacheTtlto 86400 (24h) — repeat requests within the window reuse the cached result. - Test with the built-in test button.Zapier's test step calls the real Rendex API but the captures count against your free quota — use them sparingly on paid plans.
Troubleshooting
My API key isn't validating
Confirm the key starts with rdx_ and contains exactly 22 characters after the prefix. Paste directly from your Rendex dashboard — trailing spaces will cause a 401. If the key was rotated, Zapier will still hold the old one until you reconnect the app.
The screenshot is blank or shows a loading state
The page likely renders content via JavaScript after initial load. Set Wait For Selector to a CSS selector that exists only after hydration, or bump Delay to 2000–5000 ms.
My Zap timed out
Zapier caps synchronous action runs at 30 seconds. For pages that take longer, switch to Capture Screenshot (Background) and poll with Get Job Status — or use a webhook callback.
I hit a 429 rate limit
Rendex enforces per-user rate limits to protect quality of service. Free allows 3 requests per minute; Basic 20; Starter 60; Pro 300. Spread high-volume Zaps with the Delay by Zapier step, or upgrade.
Support
Zapier-specific questions go through Zapier Support — they have full context on your Zap runs. For Rendex API questions, email support@rendex.dev or check the error reference. Both teams coordinate on escalated tickets.
Next Steps
- Create a free Rendex API key — 100 captures/month, no credit card.
- Quickstart — see the SDK and REST equivalents of every Zapier action.
- API Reference — every rendering parameter exposed in the Zapier editor is documented here.
- Webhooks — deep-dive on the async + webhook pattern used in Recipe 4.
- OG image generation and async batch rendering — the capability pages behind the most common Zapier render presets.
- Workflow recipes — copy-paste blueprints that wire a trigger straight to a Rendex render.