Using a Remote MCP Server (No Local Install)
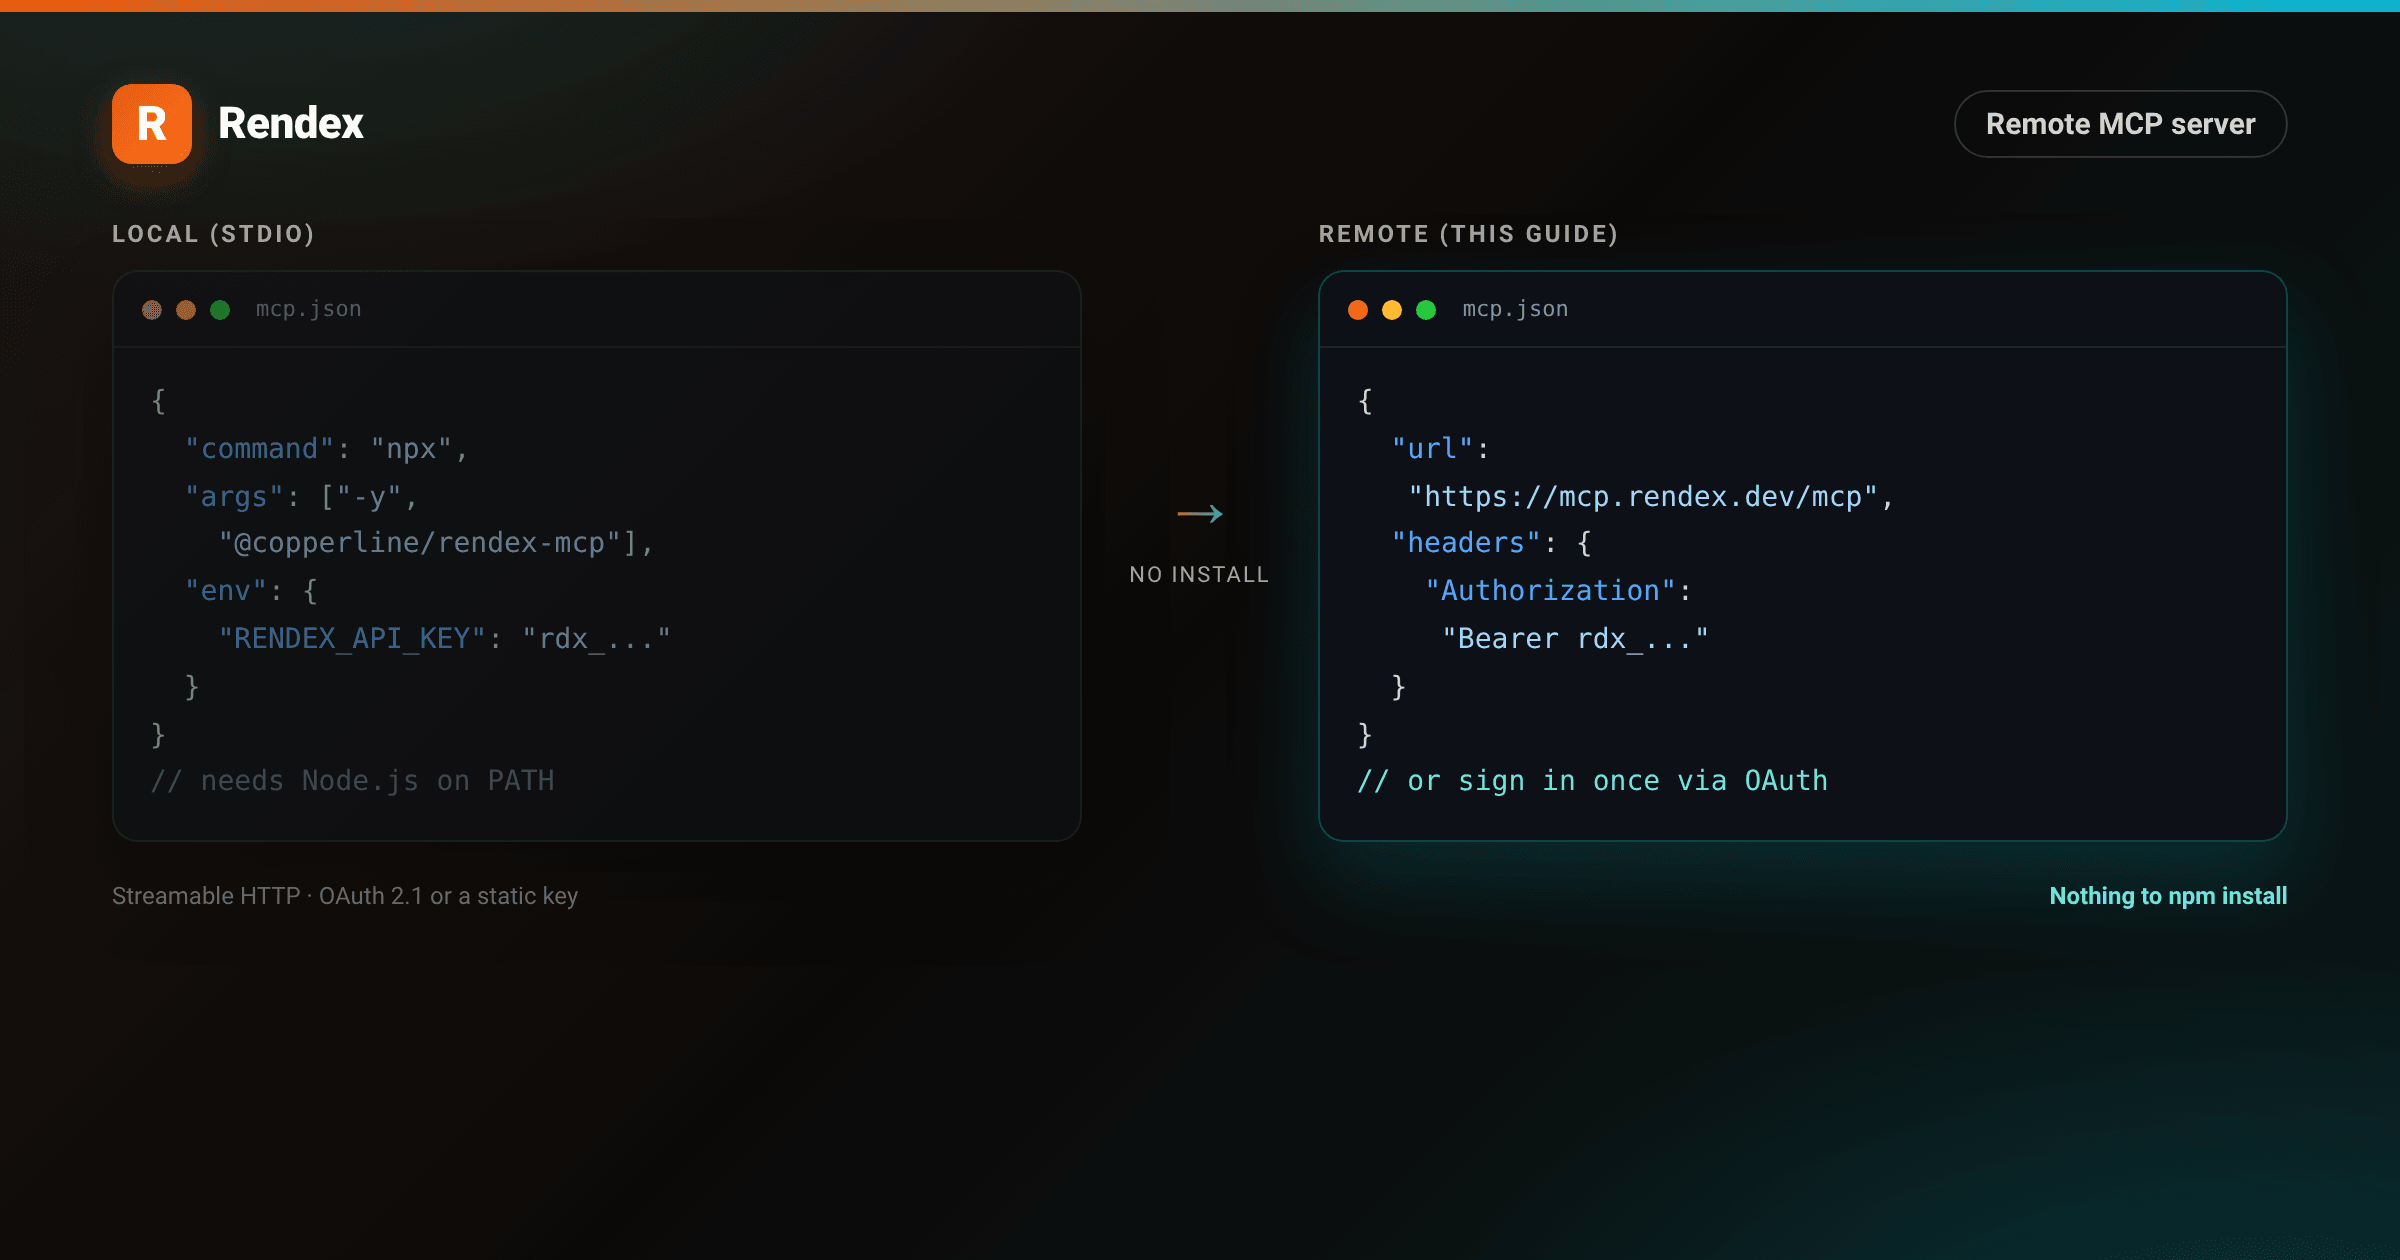
Most MCP setup guides start with npx. That works if the client can spawn a local process and your machine has Node.js on its PATH. It falls apart the moment the client is a hosted app instead of a desktop one: ChatGPT and Claude's web Connectors cannot launch a subprocess on your laptop, so a local stdio server is not an option. A remote MCP server is just a server that speaks MCP over HTTP at a fixed URL, so any client that can make a request can use it. No install, no PATH to fix, no Node version to match.
Rendex runs one at mcp.rendex.dev. This guide covers what makes a remote MCP server different from a local one, when to reach for each, and the two ways to connect: with your own API key, or with OAuth and no key at all.
Local stdio vs. remote MCP servers
A local server is a subprocess your client owns. The client runs a command (npx @copperline/rendex-mcp, for example), passes an API key through an environment variable, and talks to it over stdin/stdout. Every machine that wants the tools needs the package installed, and the key lives in a local config file.
A remote server skips the subprocess entirely. The client sends JSON-RPC requests over HTTP to a single URL and gets responses back the same way (the MCP spec calls this the Streamable HTTP transport). There is nothing to publish, version, or keep updated on the client side. The tradeoff runs the other way too: a remote server needs its own auth story, since it cannot rely on the environment variable trick a local subprocess gets for free.
Prerequisites
- A Rendex account. The free tier includes 100 renders per month with no credit card.
- An MCP client that supports remote HTTP servers: Claude Desktop, Claude's web Connectors, and ChatGPT Connectors all do. Cursor and Windsurf currently only support the local stdio method, so use the local npx config there instead.
Step 1: Connect with an API key
The fastest path if your client lets you set a custom header. Point it at https://mcp.rendex.dev/mcp and pass your key as a bearer token. This is the same config shape Claude Desktop, and most other HTTP-capable clients, expect:
{
  "mcpServers": {
    "rendex": {
      "url": "https://mcp.rendex.dev/mcp",
      "headers": {
        "Authorization": "Bearer rdx_YOUR_KEY"
      }
    }
  }
}
Get rdx_YOUR_KEY from the Rendex dashboardafter signing in. Every call made through this connection bills against that key's plan and credit pool, the same as calling the REST API directly.
Step 2: Or connect with OAuth, no key at all
Clients built for the connector model (ChatGPT, Claude) skip the key entirely. mcp.rendex.devis fronted by OAuth 2.1, so you add the server by URL, authorize once with your Rendex email, and every call from that point runs under your own account without a secret ever touching the client's config:
- In ChatGPT: Settings → Connectors → Create (enable Developer mode under Advanced if you do not see it). In Claude: Settings → Connectors → Add custom connector.
- Name it Rendex and paste
https://mcp.rendex.dev/mcpas the server URL. - Set authentication to OAuth and confirm. You will be prompted to sign in with your Rendex email using a one-time code.
- Once authorized, ask the agent to use it: for example, "Use Rendex to screenshot example.com."
Because each person authenticates as themselves, a team can share one connector configuration without sharing a key: renders bill to whoever signed in, not to a single shared credential.
Step 3: Verify it is live, no client required
Because the server just answers HTTP requests, you can check it is up and see every tool it exposes from a terminal, before wiring up any client. Discovery calls like tools/list do not touch the Rendex API and carry no secrets, so the remote server answers them without a key:
curl https://mcp.rendex.dev/mcp \
  -H "Content-Type: application/json" \
  -H "Accept: application/json, text/event-stream" \
  -d '{"jsonrpc":"2.0","id":1,"method":"tools/list"}'
A working connection returns all 13 registered tools: five rendering tools (rendex_screenshot, rendex_render_link, rendex_extract, render_artifact, rendex_account) and the eight Rendex Watch tools for website-change monitoring. Calling a tool for real (tools/call) is the one method that does require a key or an authorized OAuth token, since that is the step that actually spends a render credit.
Step 4: Use it
Once connected, describe what you want in plain language. The agent maps it to a tool call and returns the result inline:
Screenshot northwindstatus.io and tell me if everything is green.

Extract the article text from https://example.com/blog/post-title and summarize it.

Render this HTML as a PDF and give me the download link:
<html>...</html><!DOCTYPE html>
<html lang="en">
<head>
<meta charset="utf-8">
<style>
:root { --brand: #ea580c; --brand-2: #06b6d4; --teal: #0d9488; }
* { box-sizing: border-box; margin: 0; padding: 0; }
body { width: 1200px; height: 800px; background: #0c0a09; }
.panel {
width: 1200px; height: 800px; display: flex; flex-direction: column;
background: #14110f; border: 1px solid rgba(255,255,255,0.08);
font-family: -apple-system, BlinkMacSystemFont, "Segoe UI", Roboto, Helvetica, Arial, sans-serif;
-webkit-font-smoothing: antialiased; color: #e7e5e4;
}
.bar { height: 5px; background: linear-gradient(90deg, var(--teal), var(--brand-2), var(--brand)); }
.head {
display: flex; align-items: center; gap: 10px; padding: 14px 22px;
border-bottom: 1px solid rgba(255,255,255,0.07); background: #100e0c;
}
.head .dot { width: 28px; height: 28px; border-radius: 8px;
background: linear-gradient(135deg, var(--teal), var(--brand-2));
display: flex; align-items: center; justify-content: center; font-weight: 800; font-size: 14px; color: #fff; }
.head .t { font-weight: 700; font-size: 16px; color: #fafaf9; }
.head .sub { margin-left: auto; display: flex; align-items: center; gap: 6px; font-size: 12px; color: #6ee7d8;
border: 1px solid rgba(13,148,136,0.4); background: rgba(13,148,136,0.12); padding: 5px 11px; border-radius: 999px; font-weight: 600; }
.head .sub .pulse { width: 6px; height: 6px; border-radius: 50%; background: #2dd4bf; }
.body { padding: 22px 24px; display: flex; flex-direction: column; gap: 18px; flex: 1; overflow: hidden; }
.msg { display: flex; gap: 12px; }
.who { width: 28px; height: 28px; border-radius: 7px; flex: none; display: flex; align-items: center; justify-content: center; font-weight: 800; font-size: 12px; color: #fff; }
.who.u { background: #44403c; }
.who.a { background: linear-gradient(135deg, var(--teal), var(--brand-2)); }
.bubble { font-size: 15px; line-height: 1.55; padding-top: 3px; flex: 1; }
.bubble.user { color: #fafaf9; }
.toolcall {
display: inline-flex; align-items: center; gap: 9px;
font-family: ui-monospace, SFMono-Regular, Menlo, monospace;
font-size: 13px; color: #d6d3d1; background: rgba(255,255,255,0.04);
border: 1px solid rgba(255,255,255,0.10); border-radius: 9px; padding: 9px 13px; margin-bottom: 12px;
}
.toolcall .chip { font-weight: 700; color: #fff; background: var(--teal); padding: 2px 7px; border-radius: 5px; font-size: 11px; }
.toolcall .fn { color: var(--brand-2); font-weight: 700; }
.toolcall .arg { color: #a8a29e; }
.shot { border-radius: 10px; overflow: hidden; box-shadow: 0 16px 40px rgba(0,0,0,0.55); border: 1px solid rgba(255,255,255,0.08); margin-bottom: 13px; max-width: 680px; }
.shot .sc { display: flex; align-items: center; gap: 6px; padding: 8px 12px; background: #f5f5f4; }
.shot .sc i { width: 9px; height: 9px; border-radius: 50%; }
.shot .sc i:nth-child(1){ background:#ff5f56 } .shot .sc i:nth-child(2){ background:#ffbd2e } .shot .sc i:nth-child(3){ background:#27c93f }
.shot .sc .a { margin-left: 5px; font-family: ui-monospace, monospace; font-size: 10px; color: #78716c; }
.dash { background: #0b1220; color: #e2e8f0; padding: 24px 28px 28px; }
.dash .nav { display: flex; align-items: center; gap: 10px; font-size: 13px; color: #94a3b8; font-weight: 700; margin-bottom: 22px; }
.dash .nav .logo { width: 24px; height: 24px; border-radius: 6px; background: linear-gradient(135deg, var(--teal), var(--brand-2)); display: flex; align-items: center; justify-content: center; font-size: 12px; color: #fff; font-weight: 800; }
.dash .nav .name { color: #f1f5f9; font-size: 14px; margin-right: auto; }
.dash .status-row { display: flex; gap: 10px; margin-bottom: 14px; }
.dash .status-pill { display: flex; align-items: center; gap: 6px; font-size: 11px; font-weight: 700; color: #86efac; background: rgba(34,197,94,0.12); border: 1px solid rgba(34,197,94,0.3); padding: 5px 10px; border-radius: 999px; }
.dash .status-pill i { width: 6px; height: 6px; border-radius: 50%; background: #22c55e; }
.dash .grid { display: grid; grid-template-columns: repeat(3, 1fr); gap: 10px; }
.dash .card { background: #111827; border: 1px solid rgba(255,255,255,0.06); border-radius: 8px; padding: 12px 14px; }
.dash .card .label { font-size: 10px; color: #64748b; text-transform: uppercase; letter-spacing: 0.6px; margin-bottom: 6px; font-weight: 700; }
.dash .card .val { font-size: 18px; font-weight: 800; color: #f1f5f9; }
.dash .card .val.ok { color: #4ade80; }
.analysis { font-size: 14.5px; line-height: 1.65; color: #d6d3d1; max-width: 680px; }
.analysis b { color: #fafaf9; }
</style>
</head>
<body>
<div class="panel">
<div class="bar"></div>
<div class="head">
<div class="dot">R</div>
<div class="t">Rendex connector</div>
<div class="sub"><span class="pulse"></span>mcp.rendex.dev · OAuth · no API key</div>
</div>
<div class="body">
<div class="msg">
<div class="who u">You</div>
<div class="bubble user">Screenshot northwindstatus.io and tell me if everything is green.</div>
</div>
<div class="msg">
<div class="who a">R</div>
<div class="bubble">
<div class="toolcall">
<span class="chip">MCP</span>
<span><span class="fn">rendex_screenshot</span>(<span class="arg">{ url: "northwindstatus.io", fullPage: false }</span>)</span>
</div>
<div class="shot">
<div class="sc"><i></i><i></i><i></i><span class="a">northwindstatus.io</span></div>
<div class="dash">
<div class="nav">
<span class="logo">N</span>
<span class="name">Northwind Status</span>
<span>Incidents</span><span>Uptime</span>
</div>
<div class="status-row">
<div class="status-pill"><i></i>All systems operational</div>
</div>
<div class="grid">
<div class="card"><div class="label">API</div><div class="val ok">Operational</div></div>
<div class="card"><div class="label">Dashboard</div><div class="val ok">Operational</div></div>
<div class="card"><div class="label">Webhooks</div><div class="val ok">Operational</div></div>
</div>
</div>
</div>
<div class="analysis">
Every service reads <b>Operational</b> and the top banner shows
<b>“All systems operational”</b> in green. No open incidents. This ran
through the connector you authorized once, no key pasted anywhere in this chat.
</div>
</div>
</div>
</div>
</div>
</body>
</html>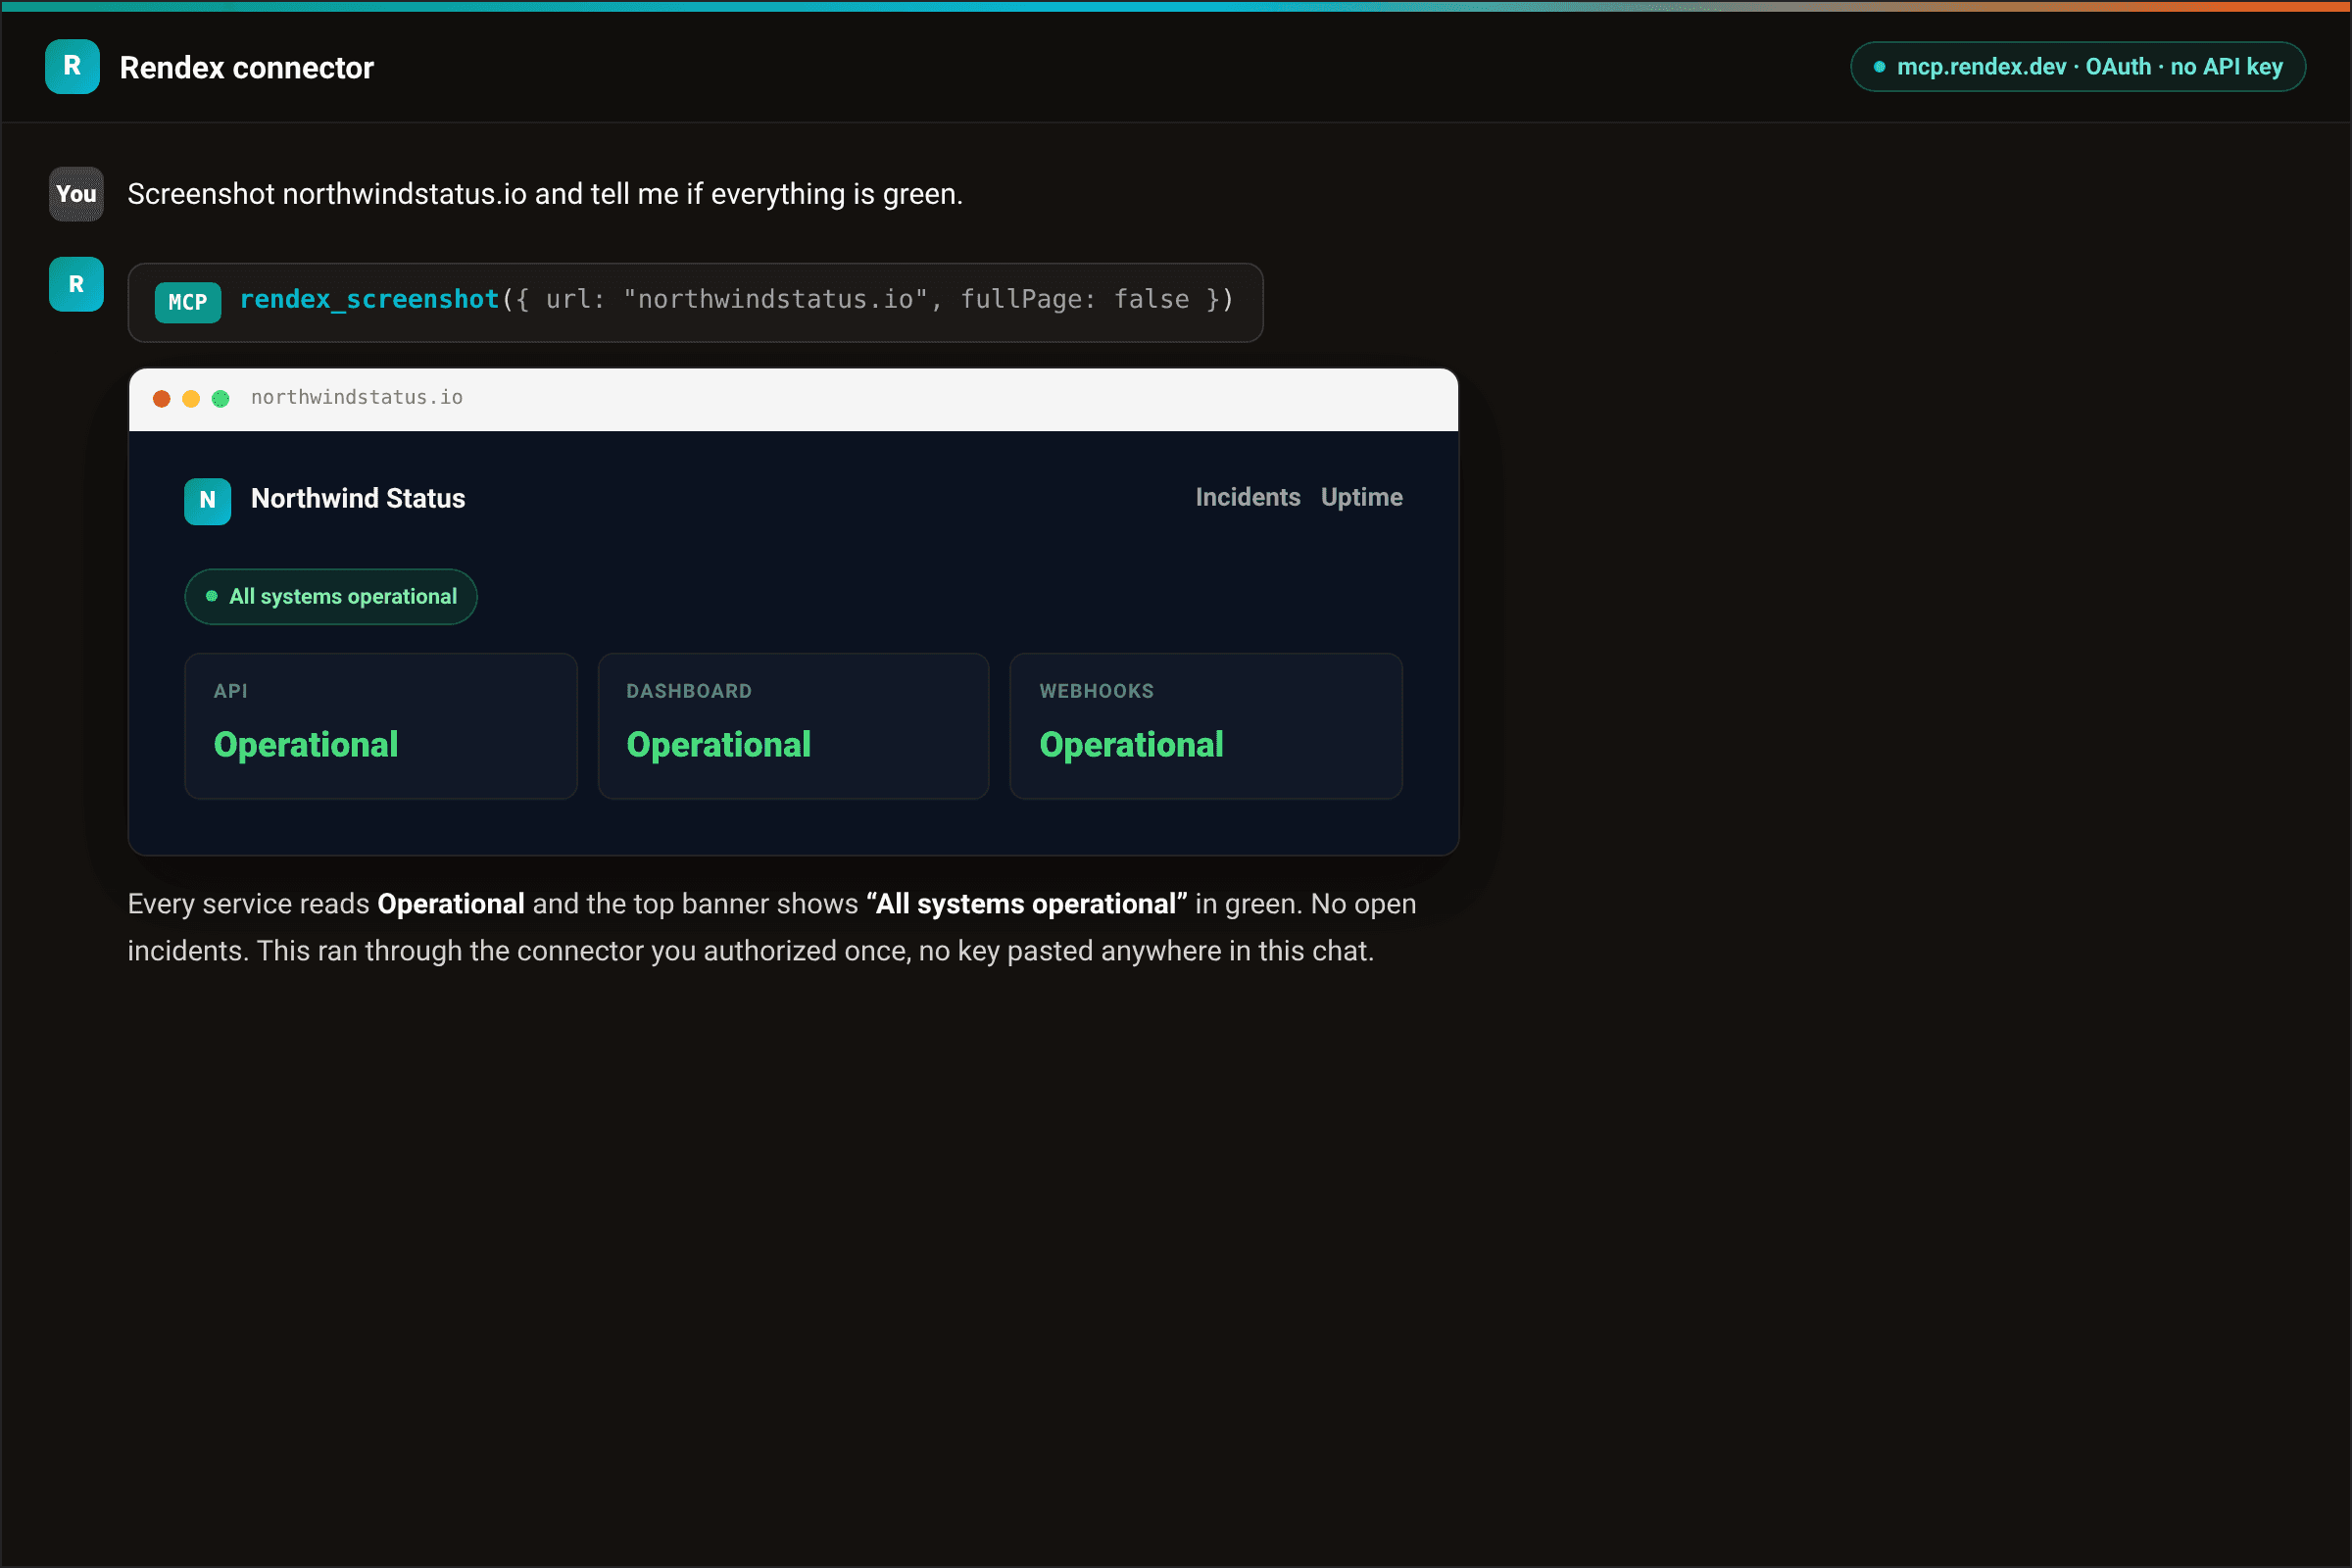
The same tools work no matter which connection method you used. A client that connected with an API key and one that connected with OAuth both get identical tool access; only the auth path and the credit pool they bill to differ.
Troubleshooting
401 or an OAuth prompt on every call. For the API key method, confirm the header is exactly Authorization: Bearer rdx_YOUR_KEY, including the space after "Bearer". For the OAuth method, the authorization can expire or get revoked; remove the connector and add it again to re-trigger the sign-in.
Connector shows no tools after authorizing. Some clients cache the tool list from the first connection attempt. Look for a refresh action in the connector settings, or remove and re-add the connector.
Client only supports local servers. If your client is Cursor, Windsurf, or another editor-first tool without remote HTTP support yet, use the local npx @copperline/rendex-mcp config from the MCP docs instead. The tool names and parameters are identical either way.
curl returns 406 Not Acceptable. The Streamable HTTP transport requires the Accept header to list both application/json and text/event-stream. Missing either one gets rejected before the request reaches a tool.
Next steps
The MCP docs cover the full parameter reference for every tool, including async capture, cookie and header injection for authenticated pages, and the Rendex Watch tools for change monitoring. If your client only supports a local process today, the Claude Desktop MCP setup guide walks through both the remote and local config side by side. And if you are weighing a hosted rendering API against running your own Puppeteer or Playwright fleet for an agent pipeline, the screenshot API for AI agents comparison breaks down the tradeoffs. Screenshots are only one of the tools this server exposes: once it's connected, an agent can also hand back a branded document instead of a picture. See AI agent PDF generation via MCP for the render_artifact tool.
To try it without connecting any client at all, run a capture through the free screenshot tool. When you are ready to wire it into an agent, get a free API key (100 renders/month, no credit card) and add the config block from Step 1, or connect via OAuth with no key to manage.